DATASET
Purpose: The Dataset module is the core schema management layer of the ETL platform. It allows users to define, organize, and manage MongoDB dataset structures — acting as the foundation for all data pipelines, jobs, and connections in the system. Before any data can flow through the platform, a dataset schema must exist to describe its shape and rules.
Accessing the Datasets Page
Navigation: ETL Management → Datasets
This is the central hub where all dataset schemas are created, searched, and managed.
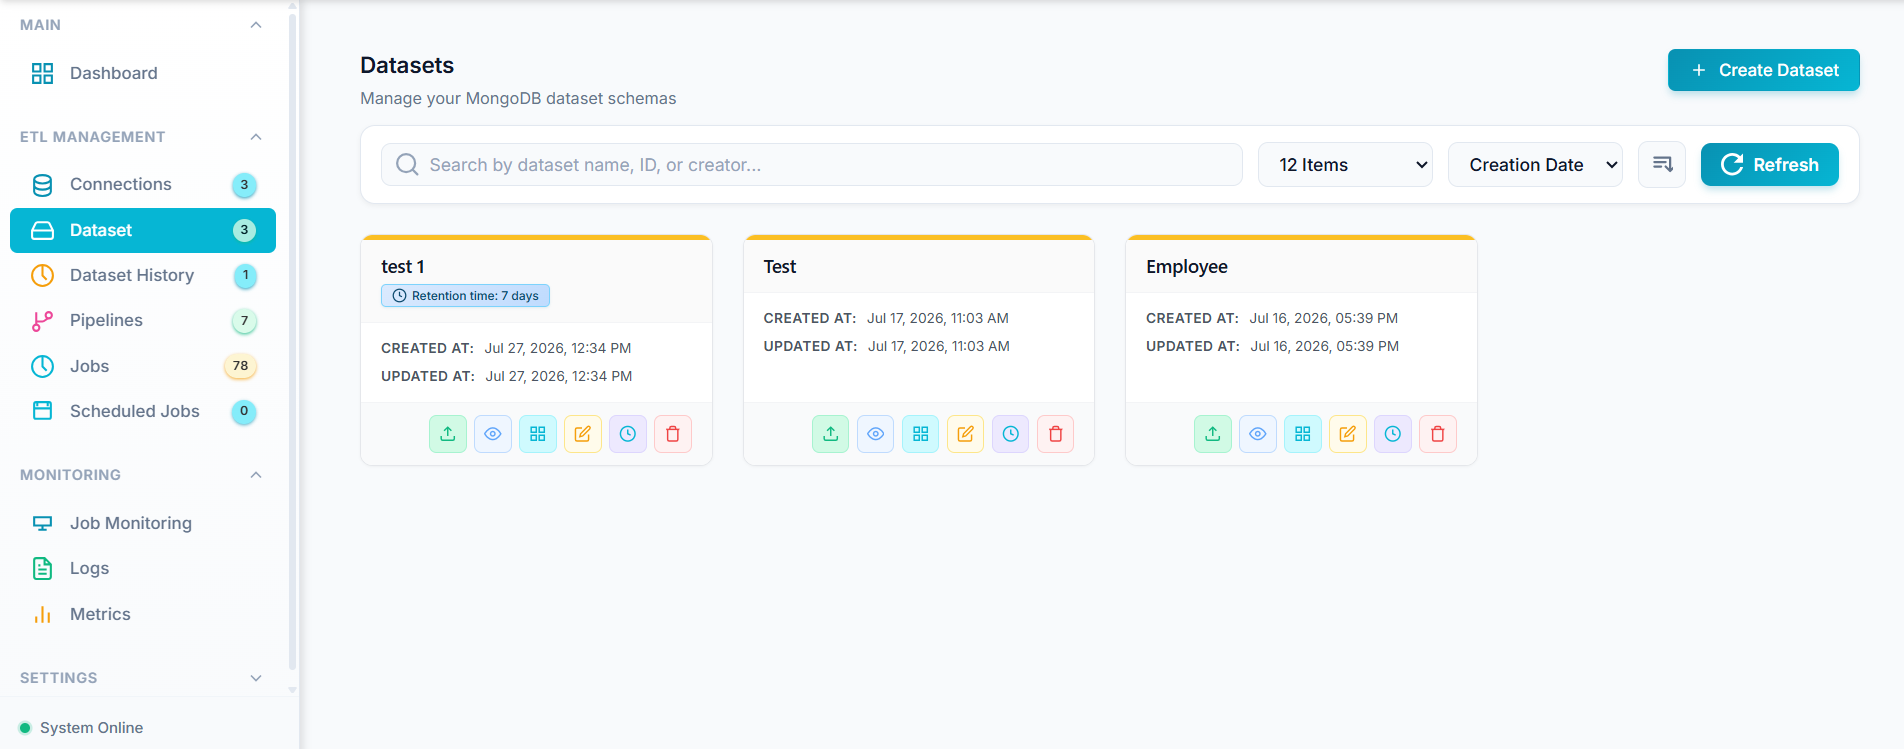
- Title/Subtitle: "Datasets" — "Manage your MongoDB dataset schemas"
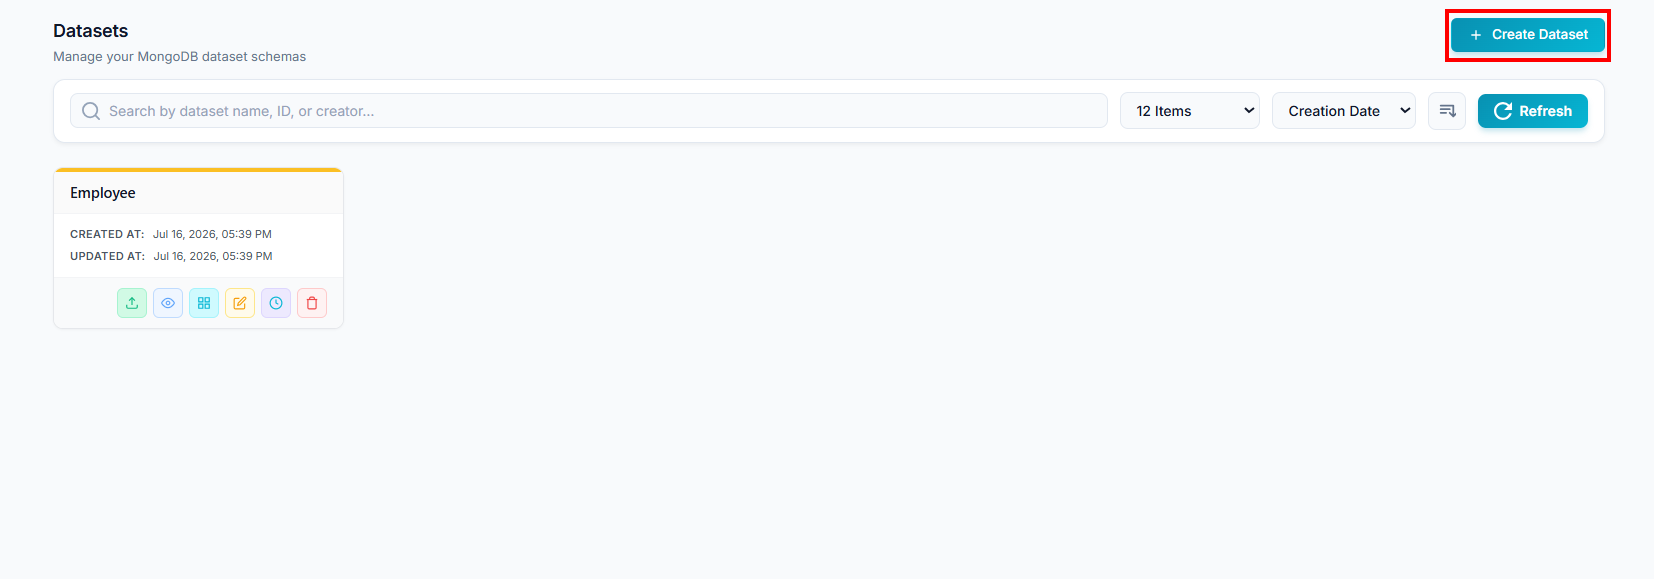
- + Create Dataset button (top-right) — entry point for adding a new dataset
Toolbar:
| Element | What it does |
|---|---|
| Search bar | Find a dataset by name, ID, or creator |
| Items dropdown | Shows total dataset count (e.g., "12 Items") with pagination/view control |
| Sort dropdown | Orders the list, e.g. by Creation Date, to find the latest schemas |
| Sort direction icon | Toggles ascending/descending order |
| Refresh button | Reloads the list to reflect the latest changes |
Dataset Process Flow Diagram
Process Flowchart: Visual workflow for Dataset and pipeline creation process.
Creating a New Dataset
Step 1 — Open the form
Click + Create Dataset. This opens the Create Dataset tab where you define the schema.
Step 2 — Set the Dataset Identity
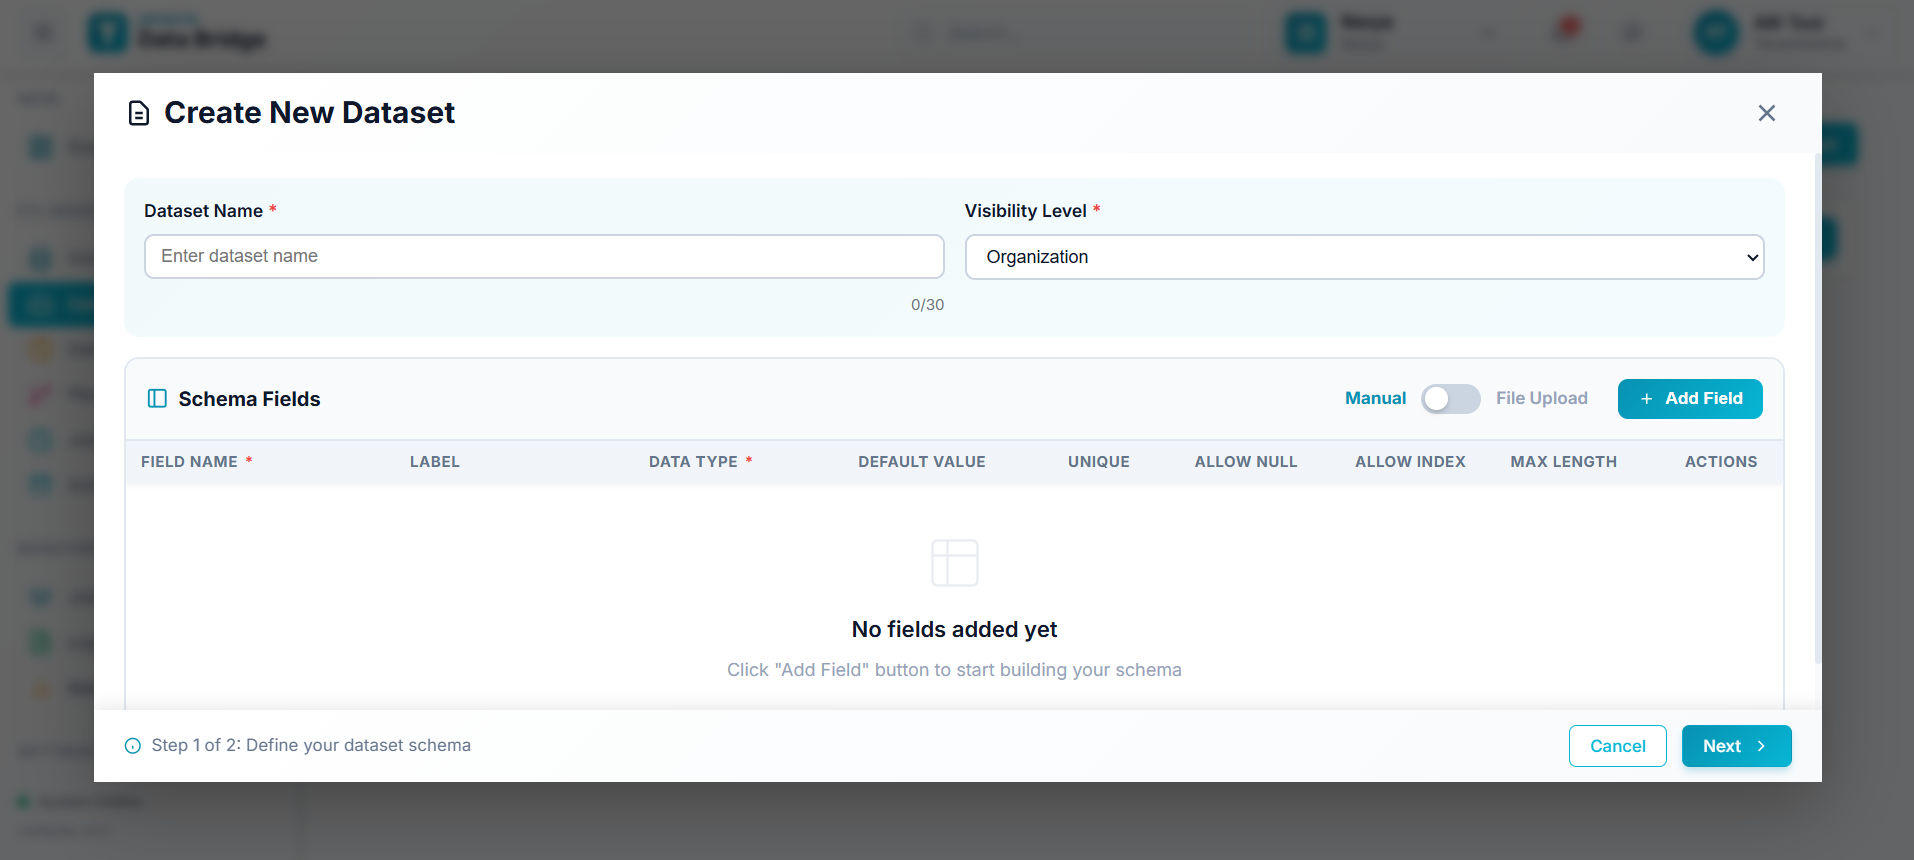
| Field | Description |
|---|---|
| Dataset Name (required) | Text input, max 30 characters (live 0/30 counter). Should be descriptive and unique within the organization. |
| Visibility Level (required) | Dropdown controlling access scope. Defaults to Organization (all members can view/use it). |
Step 3 — Define the Schema Fields
Each field (column) in the dataset is configured with:
| Column | Purpose |
|---|---|
| Field Name (required) | Internal database key (e.g., customer_id) — no spaces, follow naming conventions |
| Label | Friendly, human-readable name shown in the UI; defaults to Auto-generated if left blank |
| Data Type (required) | String, Integer, Boolean, Date, etc. — chosen from a dropdown |
| Default Value | Optional value auto-applied when no data is provided during ingestion |
| Unique | Enforces no two records share the same value — useful for IDs/emails |
| Allow Null | Permits the field to be empty; uncheck to make it mandatory |
| Allow Index | Tells MongoDB to index the field, speeding up search/filter on it |
| Max Length | Caps character/data size — helps enforce data quality |
| Actions | 🗑️ delete icon to remove the field row before saving |
You can build this list two ways (toggle at the top of the Schema Fields section):
- Manual — add and configure fields one at a time using the form rows
- File Upload — upload a structured file (e.g., CSV) and let the system auto-detect and populate the fields for you
Use + Add Field (teal button, top-right of the section) to append a new blank row in Manual mode.
Step 4: Configure Data Retention Policy
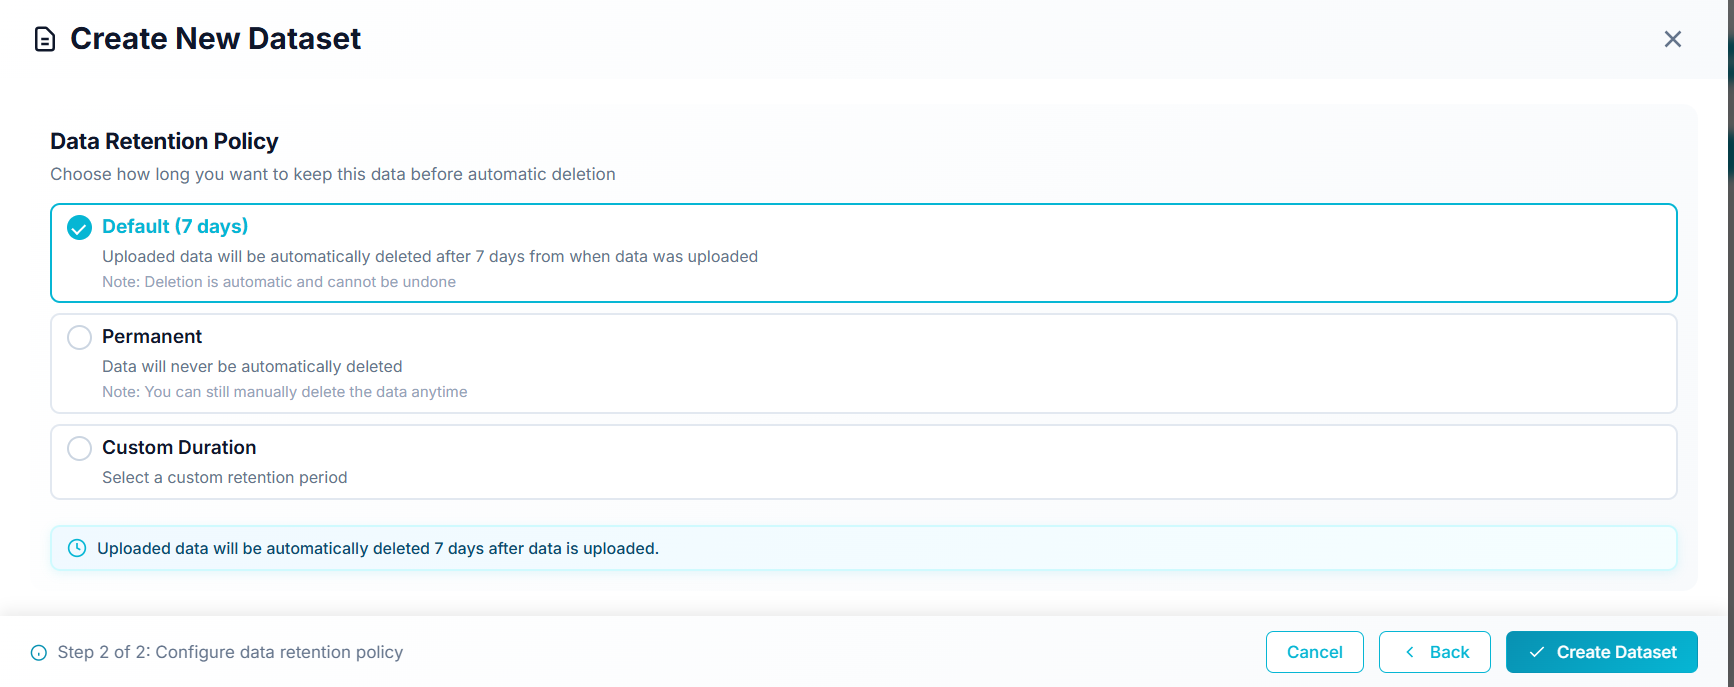
- This step sets how long the uploaded data is kept before it's automatically deleted.
| Option | Description |
|---|---|
| Default (7 days) (pre-selected) | Uploaded data is automatically deleted 7 days after it was uploaded. Note: deletion is automatic and cannot be undone. |
| Permanent | Data is never automatically deleted. Note: you can still manually delete the data anytime. |
| Custom Duration | Lets you select a custom retention period. |
Note: A confirmation banner at the bottom restates the active policy (e.g., "Uploaded data will be automatically deleted 7 days after data is uploaded").
Step 5 — Save
- Click ✓ Create Dataset (primary, teal, checkmark icon). This stays disabled until all required fields are properly filled, so incomplete schemas can't be saved by accident.
Dataset Card
Once created, every dataset appears as a card in the listing grid, showing:
- Dataset Name at the top (e.g., "Employee")
- Created At / Updated At timestamps
- A row of quick-action icons:
| Icon | Action |
|---|---|
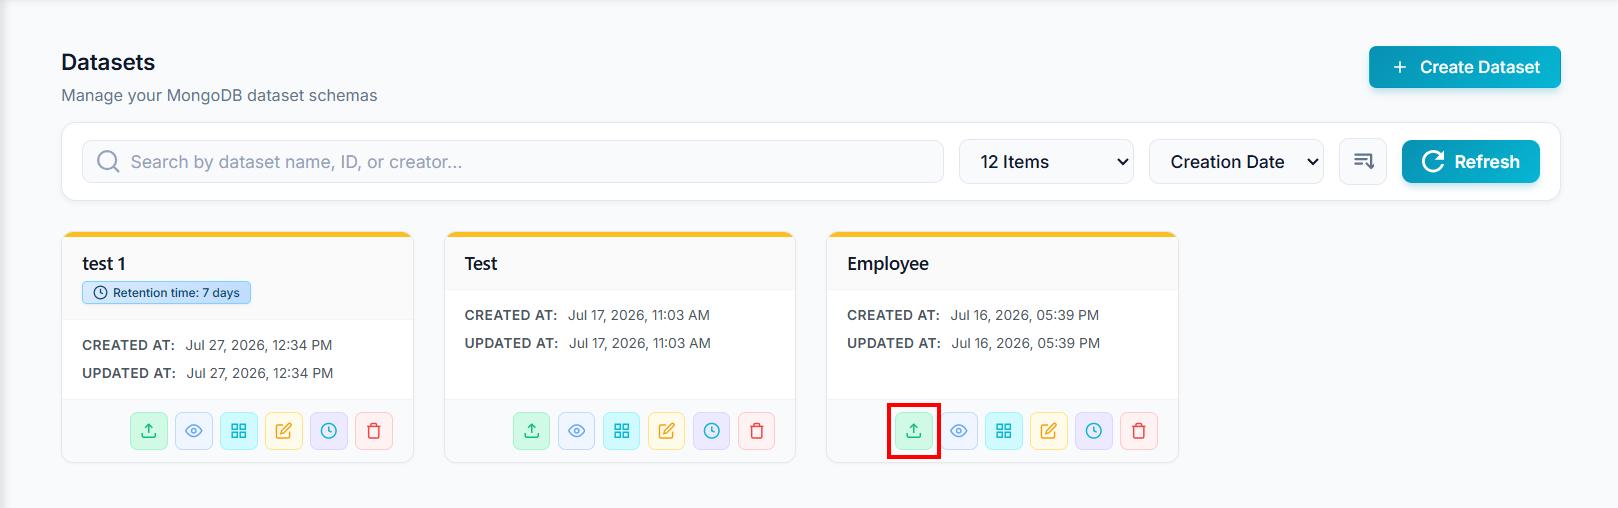
| ⬆️ Upload (green) | Upload/import data into this dataset — used in Section 6 below |
| 👁️ View (blue) | Preview the dataset's records in read-only mode — see Section 7 |
| ▦ Schema/Fields (cyan) | View or manage the dataset's field structure |
| ✏️ Edit (amber) | Edit the dataset schema definition |
| 🕐 History (purple) | View the dataset's upload/change history — see Section 8 |
| 🗑️ Delete (red) | Remove the dataset schema |
Upload Data to the Dataset
Locate the required dataset card and click the green ⬆️ Upload icon. This opens the Upload Data wizard (2 steps).
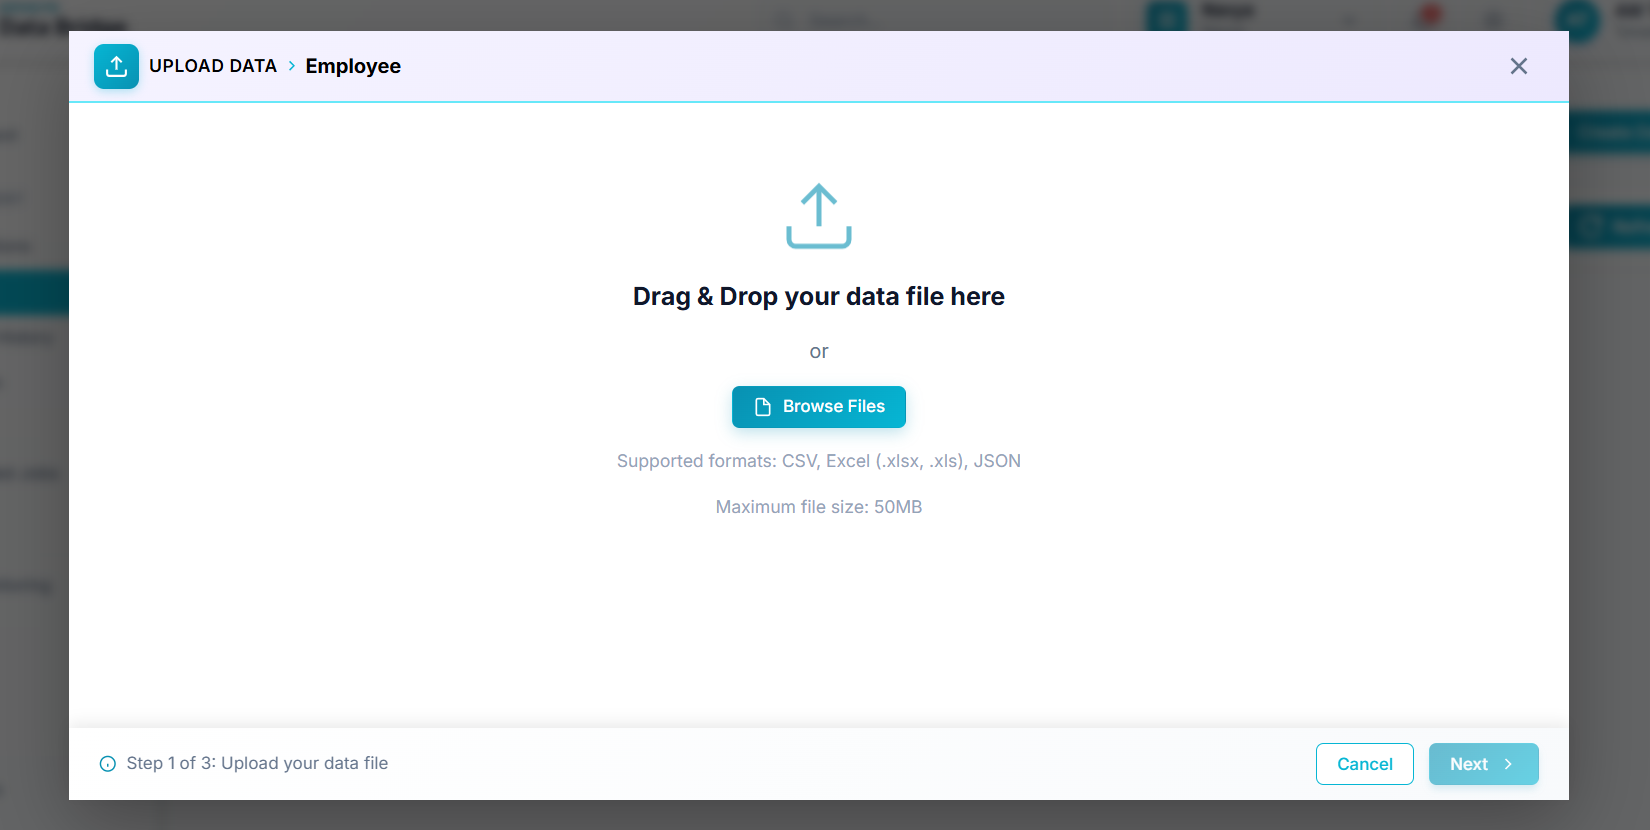
Step 1: Upload Data File
- Drag & drop your file, or click Browse Files.
- Supported formats: CSV, Excel (.xlsx, .xls), JSON. Max file size: 50 MB.
File Preview Card — once a file is selected/dropped, it appears in a highlighted card at the top:
| Element | Description |
|---|---|
| File icon | Identifies the file type visually |
| File Name | Name of the selected file (e.g., "Workspace Modules.xlsx") |
| File Meta | Size and format shown below the name (e.g., "14.29 KB • Excel") |
| Remove (✕) (red) | Removes the selected file so a different one can be chosen |
Upload Options (grid of 6 — first two are mutually exclusive radio buttons, the rest are independent checkboxes):
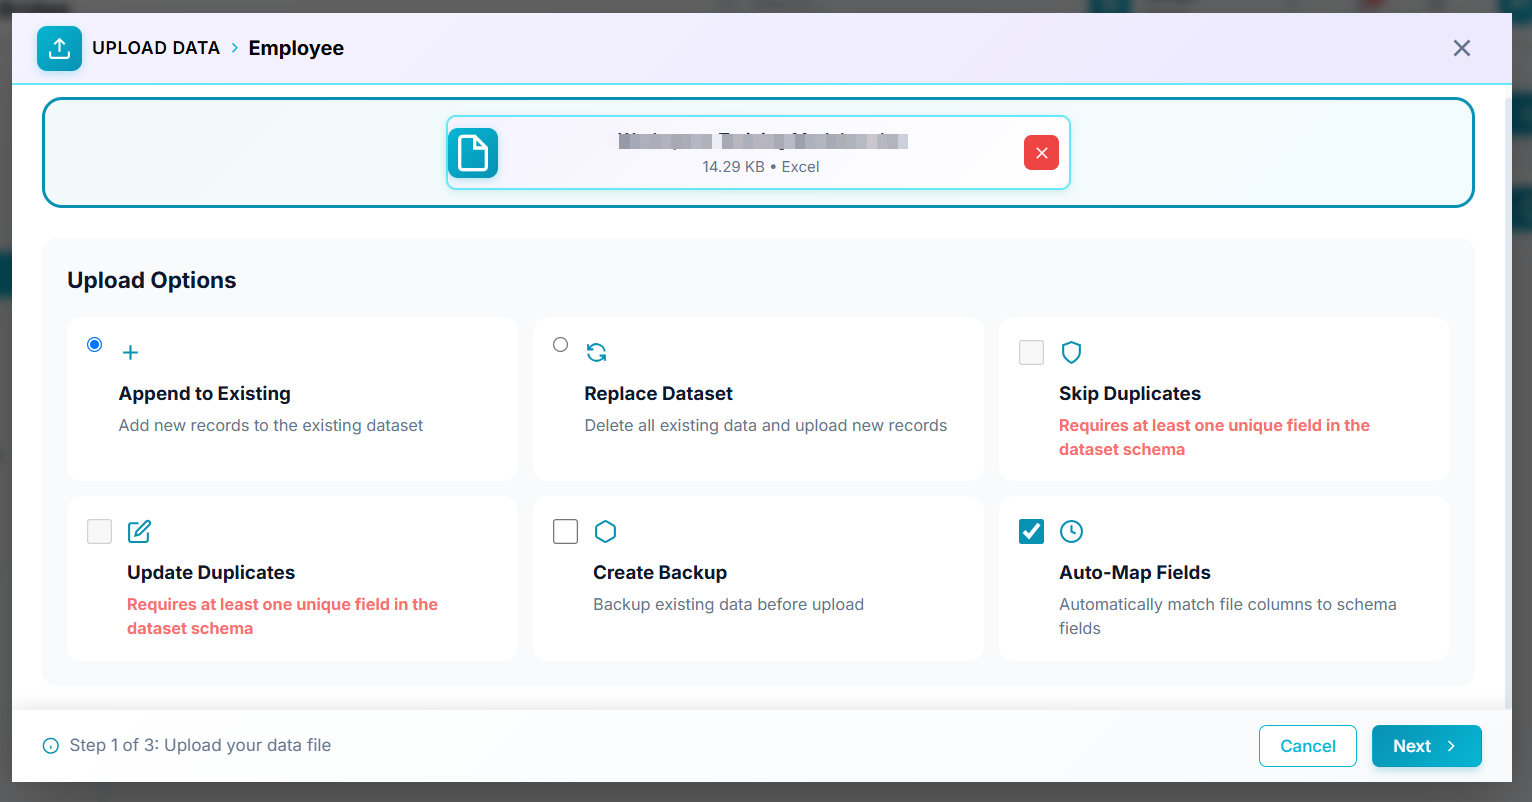
| Option | Type | Description |
|---|---|---|
| ➕ Append to Existing | Radio (default) | Adds new records without removing existing data |
| 🔄 Replace Dataset | Radio | Deletes all existing data and uploads new records in its place |
| 🛡️ Skip Duplicates | Checkbox | Skips records duplicating existing ones — requires at least one Unique field in the schema |
| ✏️ Update Duplicates | Checkbox | Updates existing records on duplicate match instead of skipping — requires at least one Unique field |
| ⬡ Create Backup | Checkbox | Backs up existing data before applying the upload |
| 🕐 Auto-Map Fields | Checkbox (default checked) | Automatically matches file columns to schema fields |
Options in red text (Skip Duplicates, Update Duplicates) have a dependency: they only work if the dataset schema has at least one field marked Unique.
Note: For the Data upload: leave all defaults as-is (Append to Existing selected, Auto-Map Fields checked) — do not change any other setting.
Footer (Step 1):
| Element | Description |
|---|---|
| Step Indicator | Shows progress, e.g. "ⓘ Step 1 of 2: Upload your data file" |
| Cancel | Closes the modal and discards the upload |
| Next → (primary, teal) | Proceeds to Step 2 — Preview & Field Mapping |
⚠️ No-Columns-Matched Warning: When advancing from Step 1 to Step 2, if auto-mapping can't match any file columns to schema fields, a warning dialog appears: - Header: red-accented banner, ⚠️ icon, title "Warning" - Message: "No columns matched. If you want to map them manually and upload, click Continue Mapping." - Go Back: returns to Step 1 to re-upload or adjust the file - Continue Mapping (primary, teal): dismisses the warning and lets you manually map each file column to a schema field
Step 2 — Preview & Field Mapping
- Step Header: a numbered circular badge (reflecting the modal's internal step count) with the title "Preview & Field Mapping".
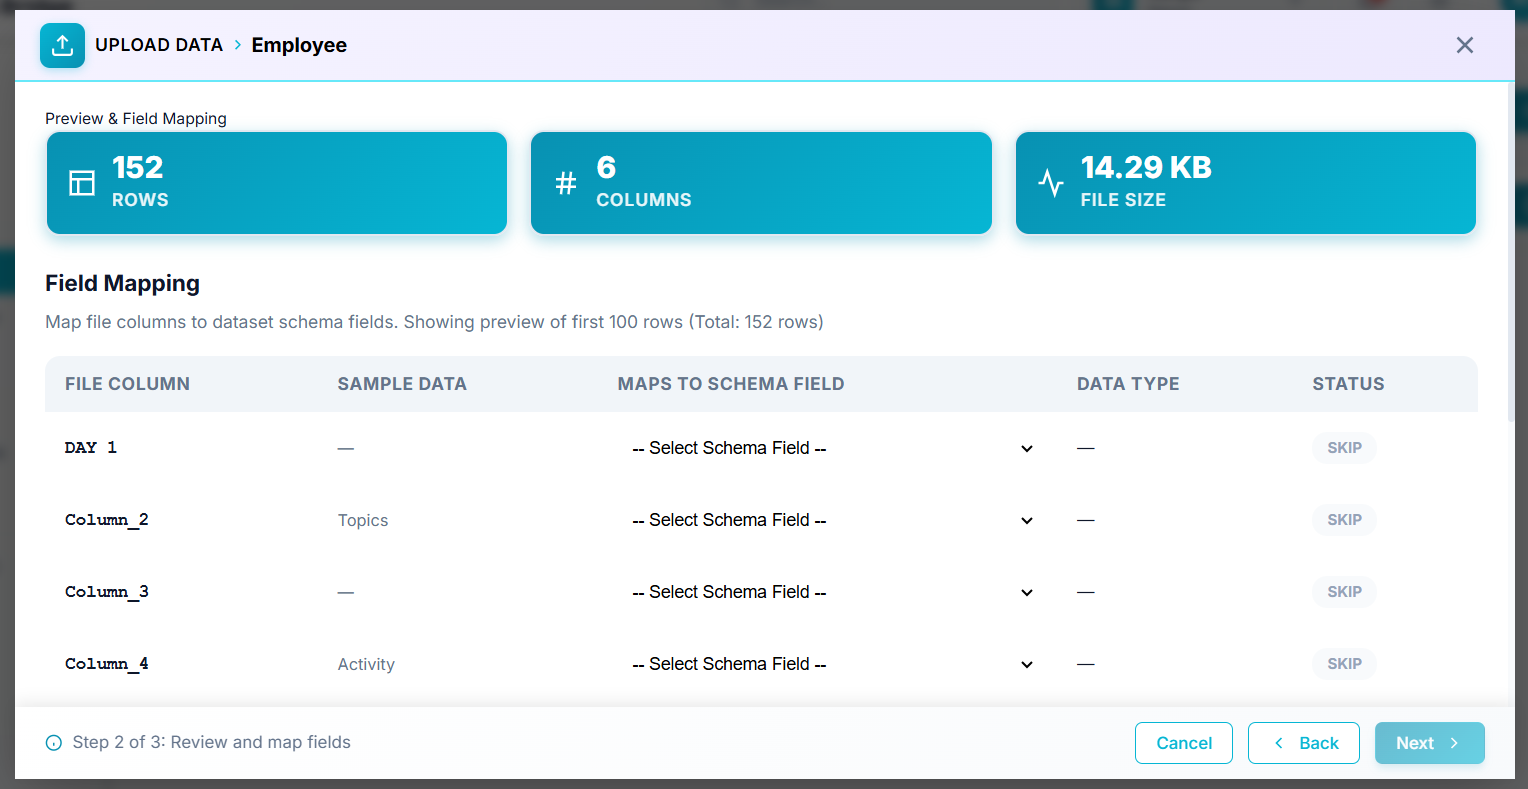
File Summary Cards — three teal stat cards summarizing the uploaded file:
| Card | Description |
|---|---|
| Rows | Total number of data rows detected in the file (e.g., 152) |
| Columns | Total number of columns detected in the file (e.g., 6) |
| File Size | Size of the uploaded file (e.g., 14.29 KB) |
Field Mapping Table — section note: "Map file columns to dataset schema fields. Showing preview of first 100 rows (Total: 152 rows)."
| Column | Description |
|---|---|
| File Column | The column header/name as it appears in the uploaded file (e.g., "Day 1", "Column_2") |
| Sample Data | An example value from that column, pulled from the file (shows "—" if empty/no sample available) |
| Maps To Schema Field | A dropdown to select which dataset schema field this file column should map to. Defaults to "— Select Schema Field —" (unmapped) |
| Data Type | Displays the data type of the mapped schema field once a mapping is selected (shows "—" until mapped) |
| Status | Shows SKIP by default for unmapped columns — that column is ignored during upload unless mapped |
- Match each "Select Schema Field" dropdown to the correct schema field for your file's columns.
Footer (Step 2):
| Element | Description |
|---|---|
| Step Indicator | "ⓘ Step 2 of 2: Review and map fields" |
| Cancel | Closes the modal and discards the upload |
| ← Back | Returns to Step 1 (Upload Your Data File) |
| ⬆️ Upload Data (primary, teal) | Finalizes and submits the mapped data for upload into the dataset |
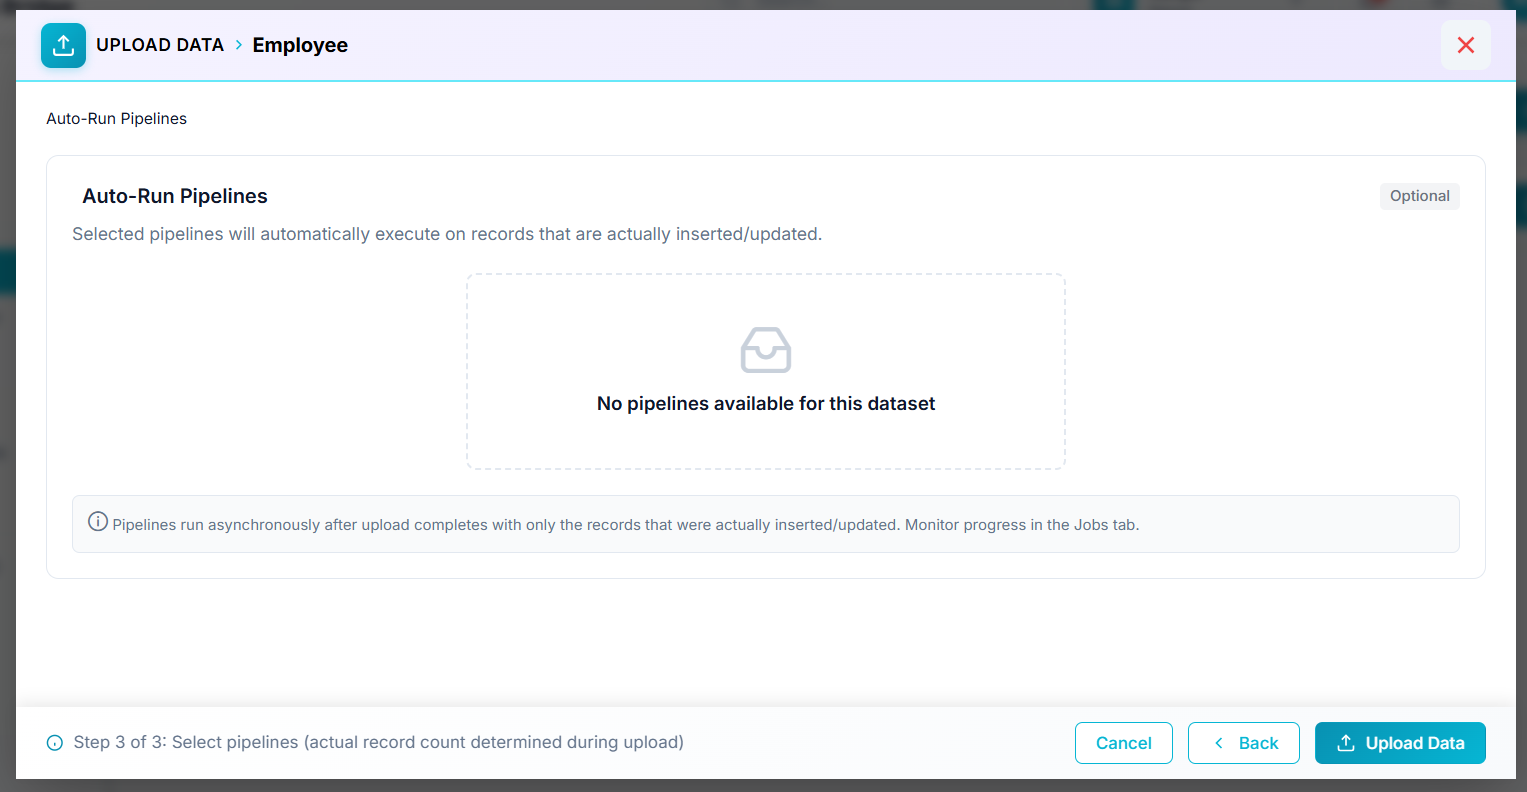
Step 3 — Auto-Run Pipelines(Optional)
This step only appears if one or more pipelines are associated with the dataset.
- Section title: "Auto-Run Pipelines" (marked Optional)
- Description: "Selected pipelines will automatically execute on records that are actually inserted/updated."
- Selection area: lists the available pipelines for this dataset as checkable items. If none exist, it shows an empty state: an inbox icon with the message "No pipelines available for this dataset."
- Info note: "Pipelines run asynchronously after upload completes with only the records that were actually inserted/updated. Monitor progress in the Jobs tab."
Step 4: Upload Data
Click on Upload Data button to finish the uploading process.
View (read-only)
Opened via the 👁️ View icon on a dataset card.
- header (e.g., "DATASET > Employee") with a close (✕) icon
- Schema Fields panel with a field-count badge (e.g., 22)
- Table columns: #, Field Name, Label, Type, Default, Max Length, and color-coded TRUE/FALSE pills for Unique, Nullable, and Indexed (green = TRUE, red = FALSE)
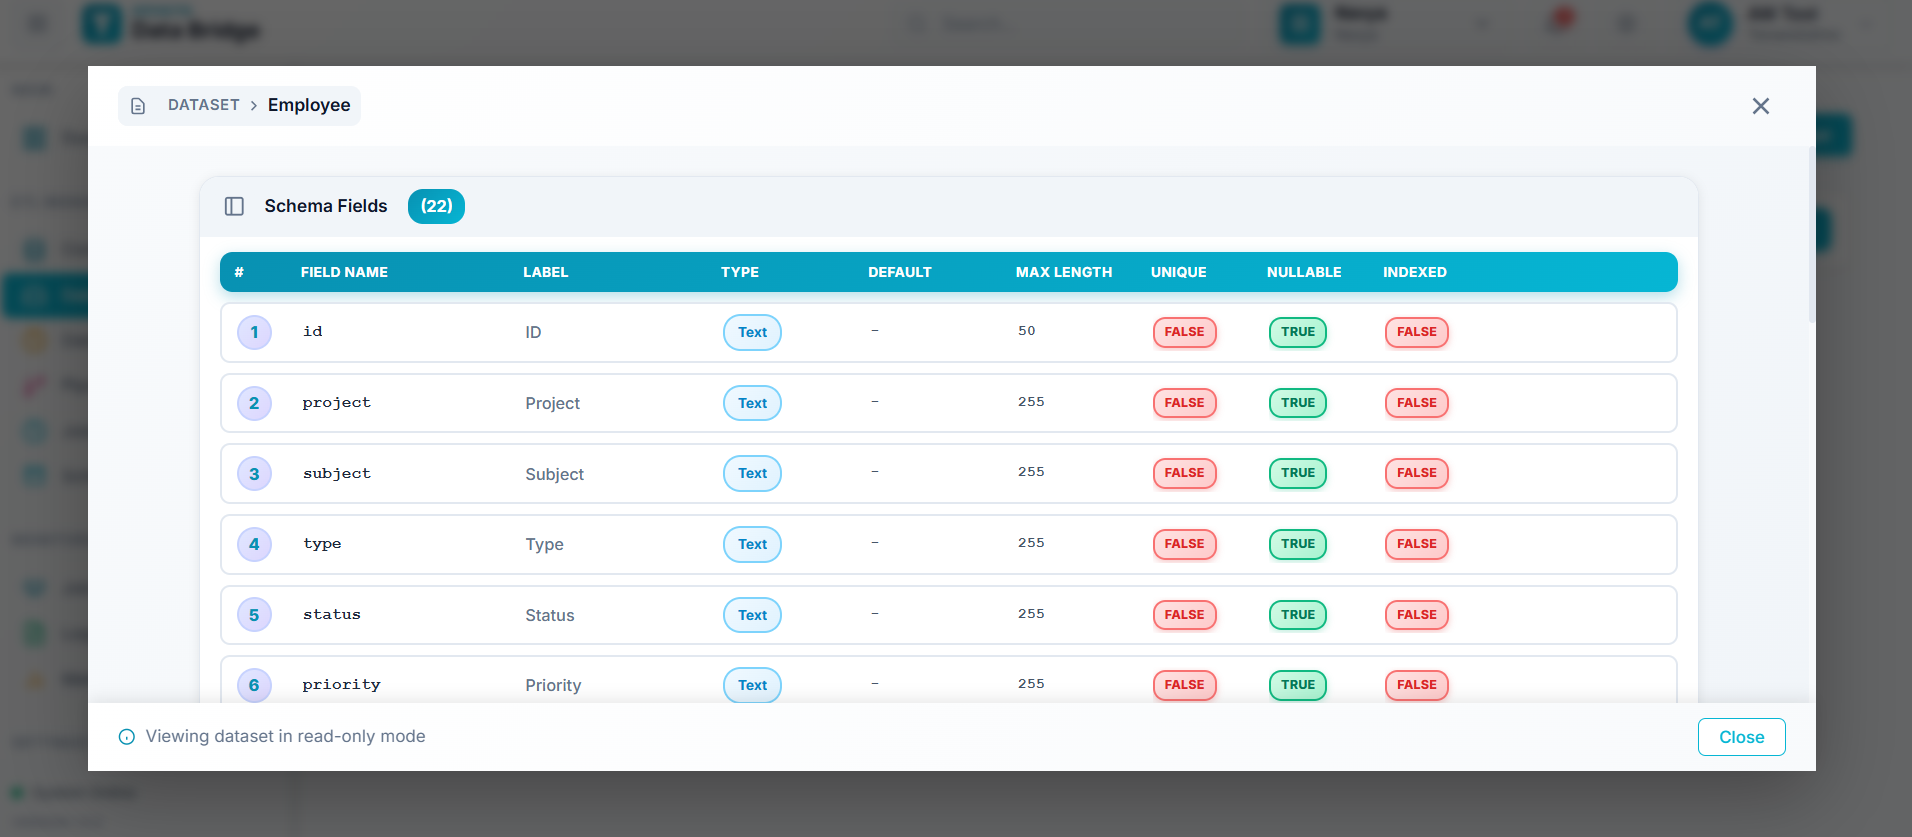
Note: "Viewing dataset in read-only mode"
Upload History
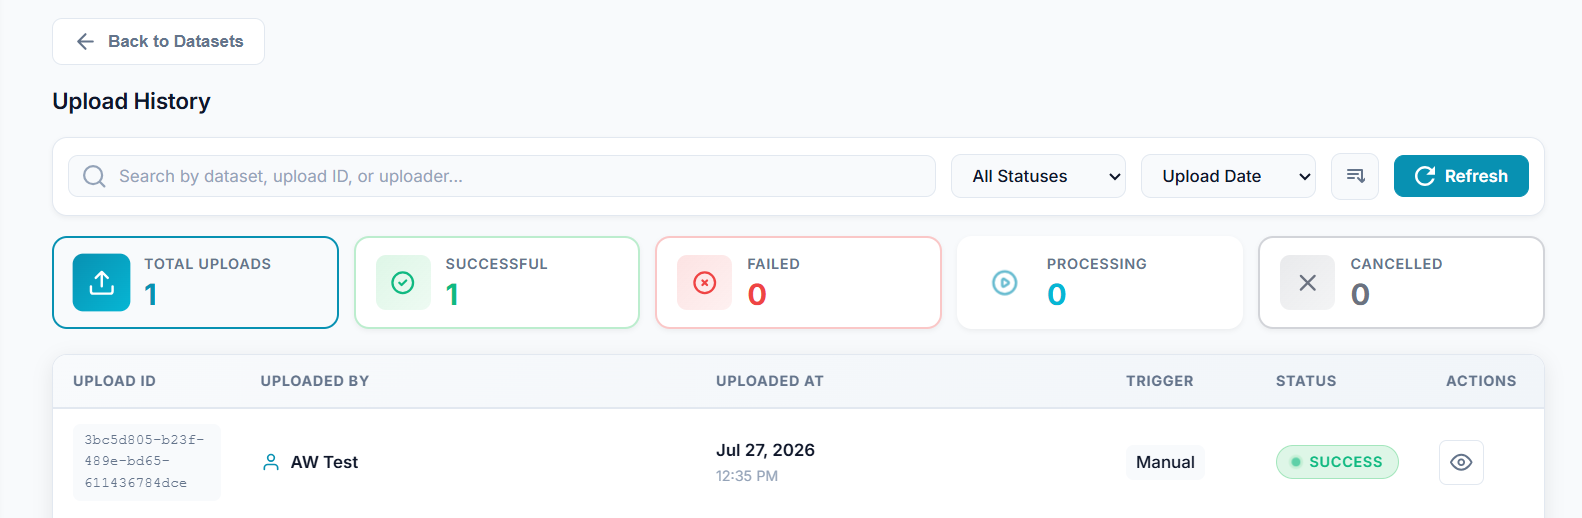
Opened via the 🕐 History icon on a dataset card. Shows all upload records for the selected dataset.
- Back to Datasets — returns to the Datasets page
- Page Title — "Upload History"
- Toolbar: Search bar ("Search by dataset, upload ID, or uploader..."), Status Filter (e.g., All Statuses), Sort By (e.g., Upload Date), Sort Direction icon, Refresh
Summary Cards (row of 5, each with an icon and count):
| Card | Description |
|---|---|
| ⬆️ Total Uploads | Total upload attempts for this dataset |
| ✅ Successful | Uploads that completed successfully |
| ❌ Failed | Uploads that failed |
| ▶️ Processing | Uploads currently in progress |
| ✖️ Cancelled | Uploads that were cancelled |
Upload Records Table — once uploads exist, each one is listed as a row with:
| Column | Description |
|---|---|
| Upload ID | Unique identifier for the upload record (e.g., 3bc5d805-b23f-489e-bd65-611436784dce) |
| Uploaded By | The user who performed the upload (e.g., "AW Test") |
| Uploaded At | Date and time of the upload (e.g., "Jul 27, 2026 · 12:35 PM") |
| Trigger | How the upload was initiated (e.g., "Manual") |
| Status | Color-coded pill showing the result (e.g., green SUCCESS) |
| Actions | 👁️ icon to view details of that upload record |
Empty State — if no upload history is available yet, the page instead displays "No Upload History Found" along with a View Datasets button to return to the Datasets page.
Platform Walkthrough Video for ETL
Frequently Asked Questions (FAQ)
1Q: What is a dataset in this platform, and why do I need one before running a pipeline?
A: A dataset is a MongoDB schema definition — it describes the fields, types, and validation rules for a piece of data. Every job, pipeline, or connection in the ETL platform relies on a dataset schema to know the shape of the data it's working with, so a dataset must exist before any data can flow through the system.
2Q: How do I create a new dataset?
A: Go to ETL Management → Datasets and click + Create Dataset. Fill in the Dataset Name (up to 30 characters) and Visibility Level, then define your Schema Fields either manually (row by row) or by uploading a file so the system auto-detects the fields. Click ✓ Create Dataset once all required fields are filled — the button stays disabled until then.
3Q: What's the difference between "Append to Existing" and "Replace Dataset" during upload?
A: Append to Existing (the default) adds new records without touching current data. Replace Dataset deletes all existing data in the dataset first, then uploads the new records in its place. These two options are mutually exclusive — you must choose one.
4Q: Can I use "Skip Duplicates" or "Update Duplicates" on any dataset?
A: Only if the dataset schema has at least one field marked Unique. Without a Unique field, the system has no way to detect what counts as a duplicate, so these options won't be effective.
5Q: What happens to unmapped columns in the Field Mapping step?
A: Any file column not mapped to a schema field shows a status of SKIP, meaning it will be ignored entirely during the upload.
6Q: How can I check whether a past upload succeeded or failed?
A: Click the 🕐 History icon on the dataset card to open Upload History. It shows summary cards for Total, Successful, Failed, Processing, and Cancelled uploads, plus a searchable, sortable, filterable list of individual upload records.