USER MANAGEMENT
Purpose: Provide a centralized hub for managing identities and access within the platform. By utilizing a role-based access control (RBAC) model, this module ensures that users only have the tools and data necessary for their specific job functions, enhancing both security and operational efficiency.
Users
While roles define what can be done, Managing Users determines who can do it. This section allows Tenant Administrators to onboard new team members, manage their lifecycle, and securely control their access across the Advaita Workspace platform.
Accessing Users
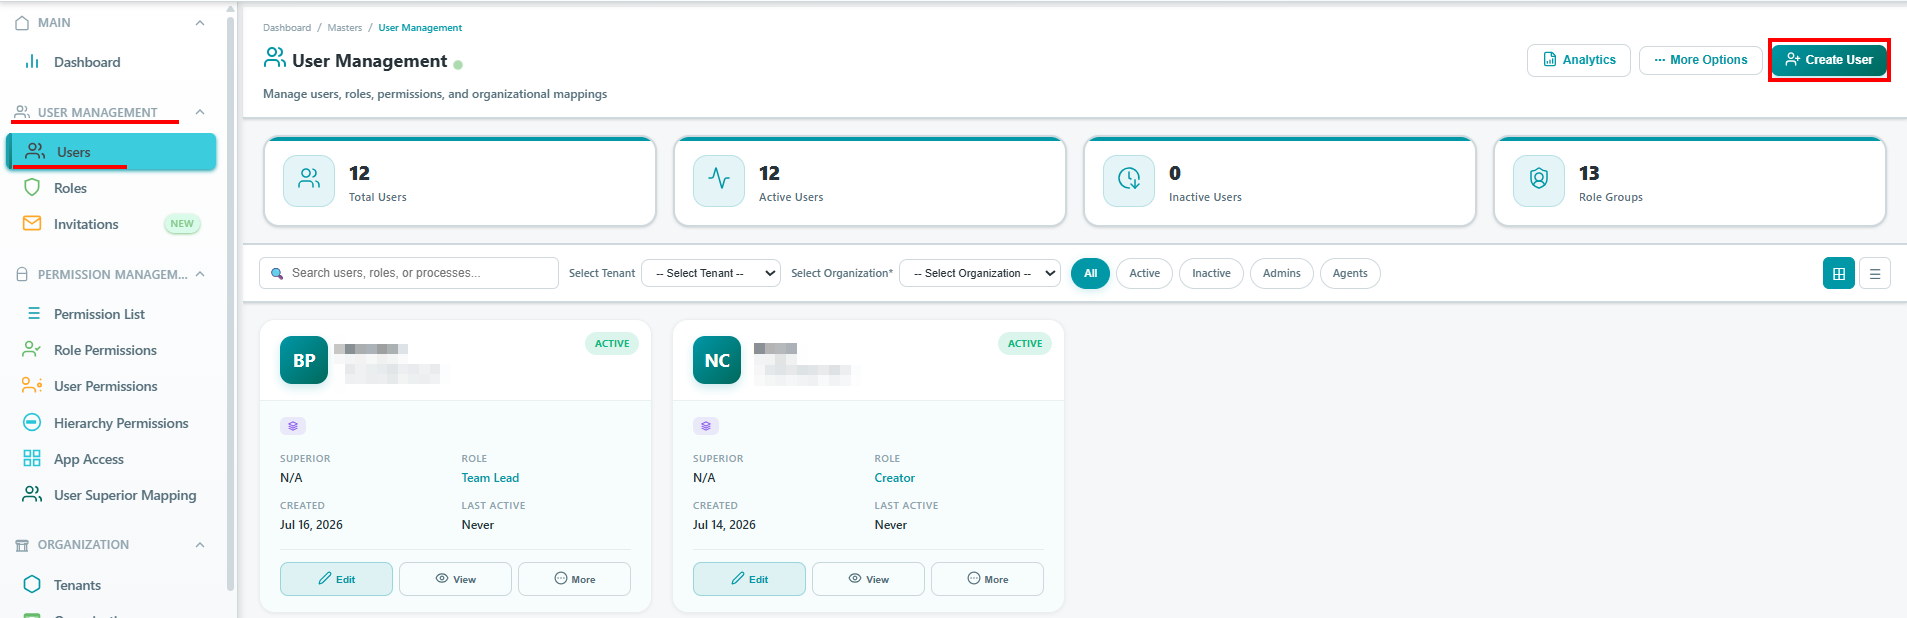
Navigation: User Management → Users
User Landing Page Overview
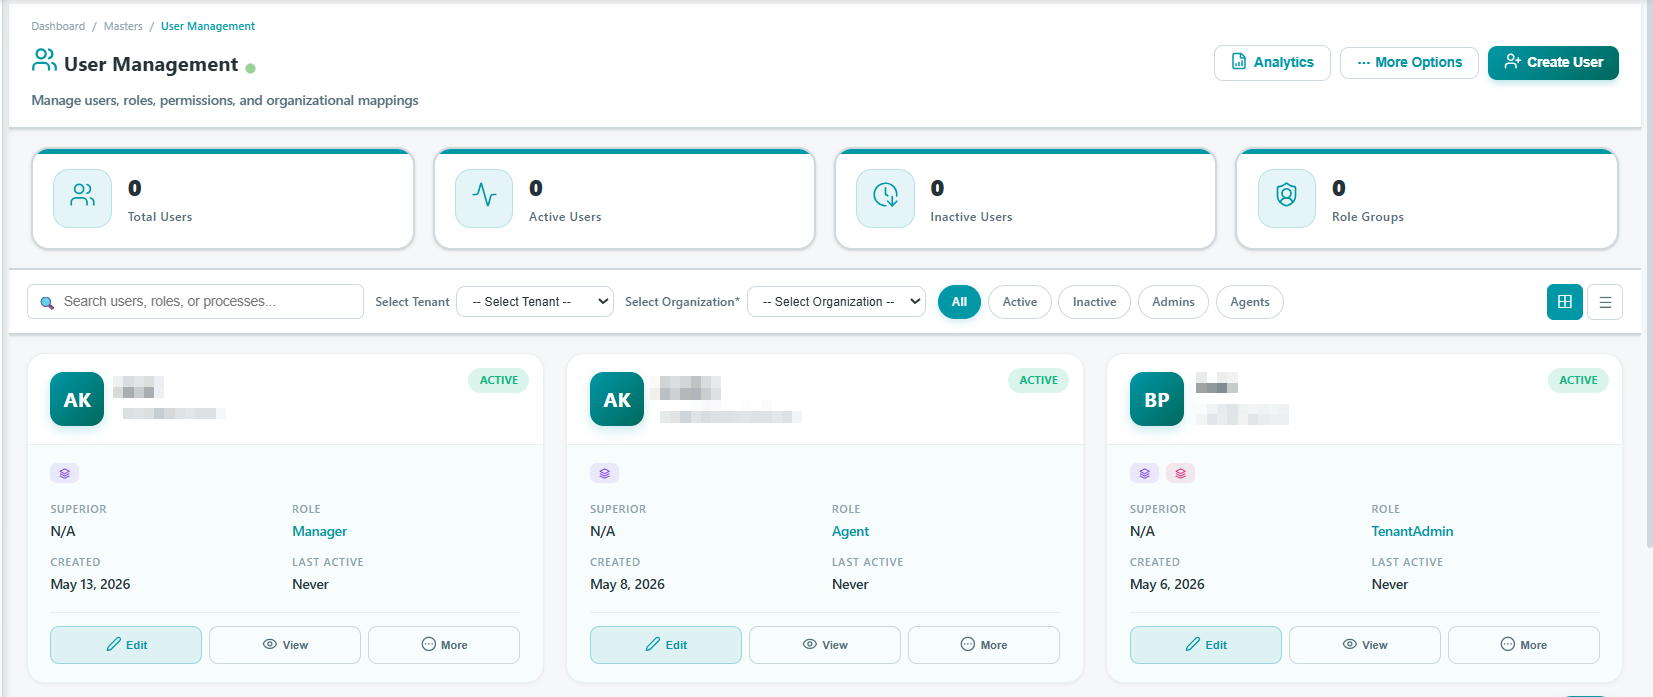
The User page provides a centralized view for managing users, roles, permissions, and organizational mappings.
Top Bar
The top-right section provides quick access to frequently used administrative actions.
Action Buttons
- Analytics – Opens the analytics dashboard to view user-related insights and statistics.
- + Create User – Creates a new user account by opening the user creation form.
- ... More Options – Provides additional bulk operations and administrative utilities. Available options include:
| Option | Description |
|---|---|
| Upload System Mapping | Import system mapping information from a supported file. |
| Upload Users | Bulk-create users by uploading a formatted import file. |
| Download Users | Export the existing user list for reporting or backup purposes. |
| User Listing with Stages | Generate a report showing users along with their associated workflow stages. |
| User Removal with Stages | Remove users in bulk based on their assigned workflow stages. |
Note: A floating + button is also available at the bottom-right corner of the page, providing quick access to the Create User screen.
Insights Dashboard
The dashboard displays summary cards that provide an overview of the current user base.
- Total Users – Total number of users in the system.
- Active Users – Users whose accounts are currently active.
- Inactive Users – Users whose accounts have been disabled or deactivated.
- Role Groups – Total number of role groups configured in the system.
These metrics help administrators quickly assess overall user distribution and account status.
Search & Filter Controls
The toolbar below the dashboard allows administrators to quickly locate users and refine the displayed results.
- Search Bar – Search users by name, email address, role, or related keywords.
- Tenant Filter – Display users belonging to a specific tenant.
- Organization Filter – Narrow the user list to a selected organization.
- Status Filters – Quickly filter users by predefined categories such as All, Active, Inactive, Admins, and Agents.
- View Toggle – Switch between Grid (Card) view and Table view based on your preferred layout.
Using these filters together makes it easier to manage large user lists.
Users Cards Overview (Existing user and New users created)
In Grid View, each user is displayed as an individual card containing key information and quick actions.
User Information
Each card displays:
- User initials, full name, and registered email address.
- Current account status (for example, Active).
- Organization indicator showing the user's assigned organization.
- Reporting Superior (manager), if assigned.
- Assigned Role within the system.
- Created date indicating when the account was added.
- Last Active timestamp showing the user's most recent activity.
This layout provides a quick overview of each user's profile without opening the full record.
User Actions
Every user card includes action buttons for common management tasks.
| Action | Description |
|---|---|
| ✏️ Edit | Update the user's information, role, organization, or other configuration settings. |
| 👁️ View | Open the user's profile in read-only mode to review complete details. |
| ... More | Displays additional management options for the selected user. |
Additional actions available from the More menu include:
| Action | Description |
|---|---|
| ✅ / 🚫 Activate / Deactivate | Enable or disable the user's account. |
| 🔑 Reset Password | Send a password reset request to the user. |
| 🗑 Delete User | Permanently remove the user from the system. |
Users Process Flow Diagram
Process Flowchart: Visual workflow for creating a new user.
Create a New User
Step 1: Click the + Create User button at the top-right corner of the Users page.
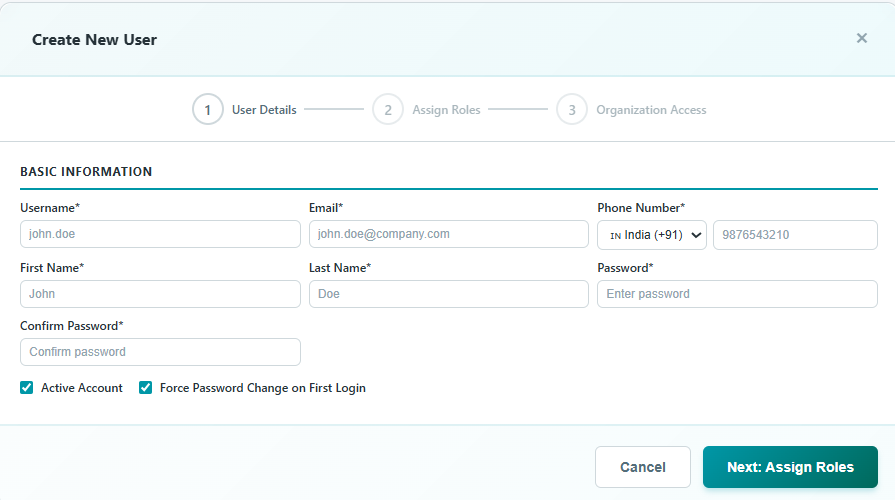
Step 2: Enter the required User Details: Username, Email, Phone, First/Last Name, Password.
Step 3: Configure Account Status and Password Change settings.
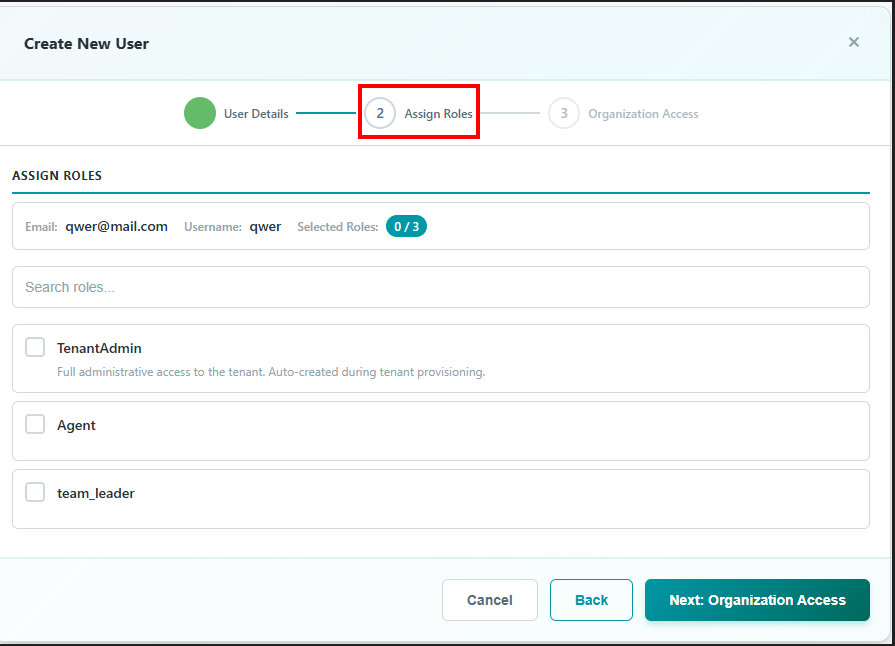
Step 4: Assign one or more Roles.
Step 5: Define Organization Access and Primary Organization.
Step 6: Assign Org-Specific Roles.
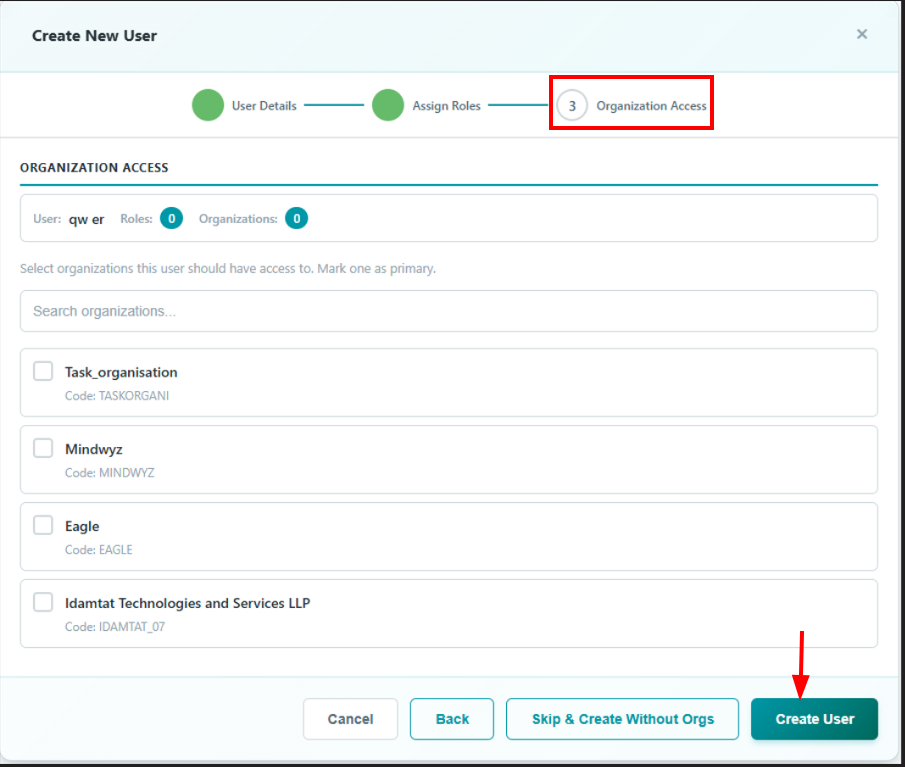 Step 7: Click Create User.
Note: Usernames cannot be changed after creation. Users may hold multiple roles and belong to multiple organizations.
Roles
Roles act as the vital bridge between users and system permissions. Instead of assigning individual rights to every single user, administrators create logical Roles (e.g., "Sales Manager", "Support Agent") and assign a collection of permissions to them. This makes scaling your team and maintaining security significantly easier.
Accessing Roles
Navigation → User Management → Roles
Roles Landing page Overview
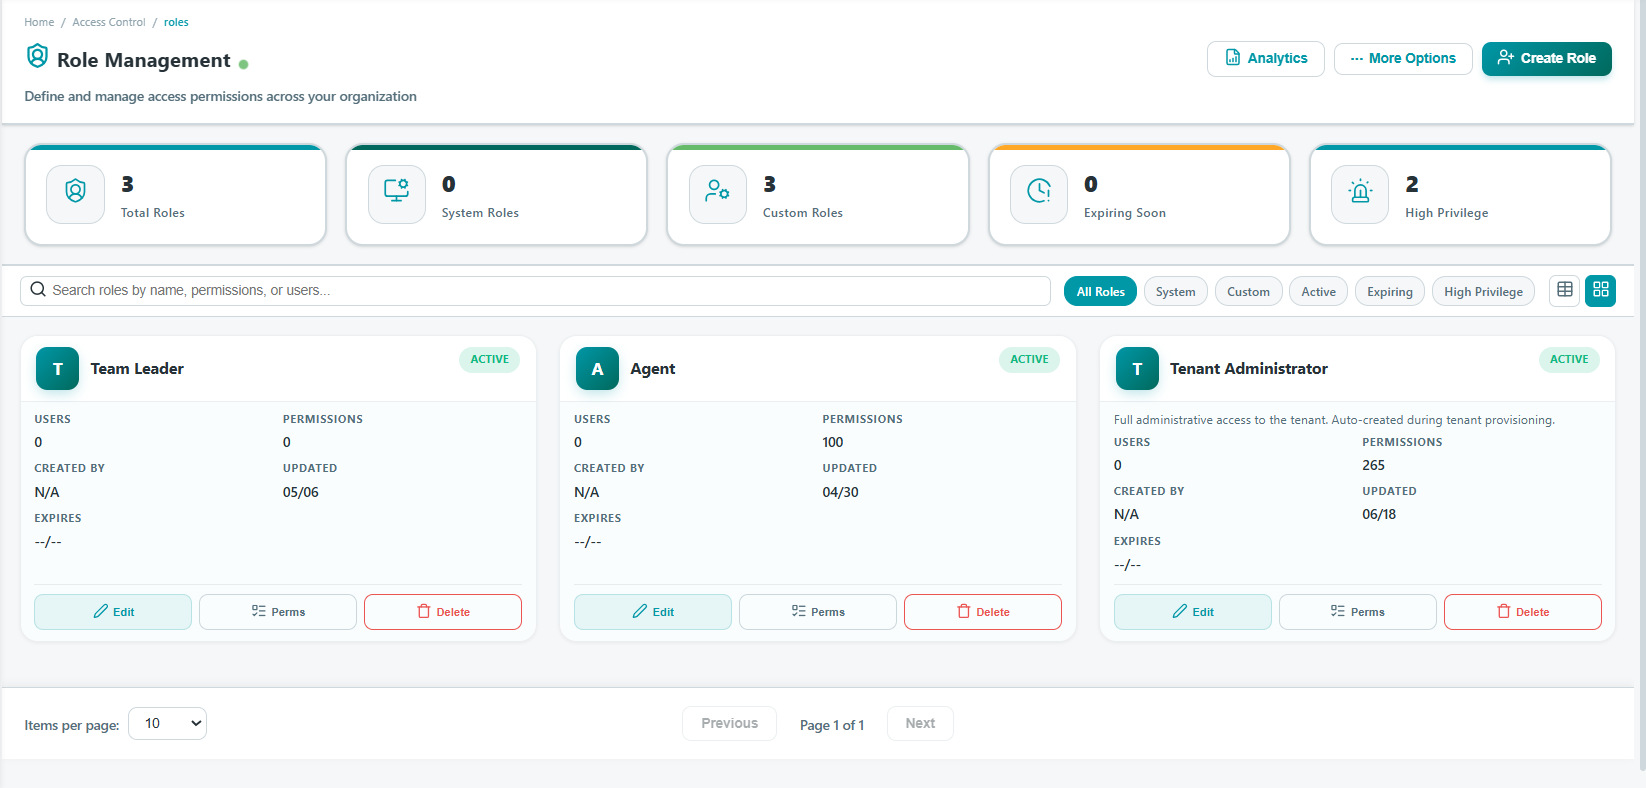
The Role dashboard provides a comprehensive view of all roles within your organization, combining real-time metrics with easy management tools.
Top Bar
The top-right section provides quick access to role management tools and administrative actions.
Action Buttons
- Analytics – Opens the analytics dashboard to view role-related insights and permission statistics.
- + Create Role – Creates a new role by opening the role creation form.
- ... More Options – Provides additional utilities for importing, exporting, auditing, and managing roles. Available options include:
| Option | Description |
|---|---|
| Upload Roles | Import multiple roles from a supported file format. |
| Export Roles | Export the existing role configurations for reporting or backup purposes. |
| Audit Trail | View the history of role creation, updates, and other modifications. |
| Role Templates | Access predefined role templates to simplify the creation of new roles. |
| Bulk Actions | Perform actions on multiple selected roles simultaneously. |
Insights Dashboard
The dashboard displays summary cards that provide an overview of the configured roles.
- Total Roles – Total number of roles available in the system.
- System Roles – Built-in roles provided by the application.
- Custom Roles – Roles created by administrators to meet organization-specific requirements.
- Expiring Soon – Roles that are approaching their configured expiry date.
- High Privilege – Roles with elevated permissions and administrative access.
These metrics provide a quick snapshot of the organization's role configuration and permission distribution.
Search & Filter Controls
The toolbar below the dashboard helps administrators quickly locate and organize roles.
- Search Bar – Search roles by role name, assigned permissions, or associated users.
- Role Filters – Filter roles using predefined categories such as All Roles, System, Custom, Active, Expiring, and High Privilege.
- View Toggle – Switch between Grid (Card) view and Table view depending on your preferred layout.
These controls make it easier to manage large numbers of roles efficiently.
Role Cards Overview(Existing Roles and new roles created)
In Grid View, each role is displayed as an individual card containing its key information and available actions.
Role Information
Each card displays:
- Role name along with its current status (for example, Active).
- Number of users currently assigned to the role.
- Total permissions granted to the role.
- Created By information showing who created the role.
- Updated date indicating when the role was last modified.
- Expires date, if an expiration period has been configured.
This layout allows administrators to quickly review role details without opening the full configuration.
Role Actions
Each role card provides quick access to common management actions.
| Action | Description |
|---|---|
| ✏️ Edit | Modify the role's details, configuration, or properties. |
| 🔐 Perms | View and manage the permissions assigned to the role. |
| 🗑 Delete | Permanently remove the role from the system. |
Note: System-defined roles may have restrictions on editing or deletion based on system configuration and user permissions.
Roles Process Flow Diagram
Process Flowchart: Visual workflow for creating a new role.
Create a New Role
Step 1: Click the + Create Role button at the top-right corner of the Roles page..
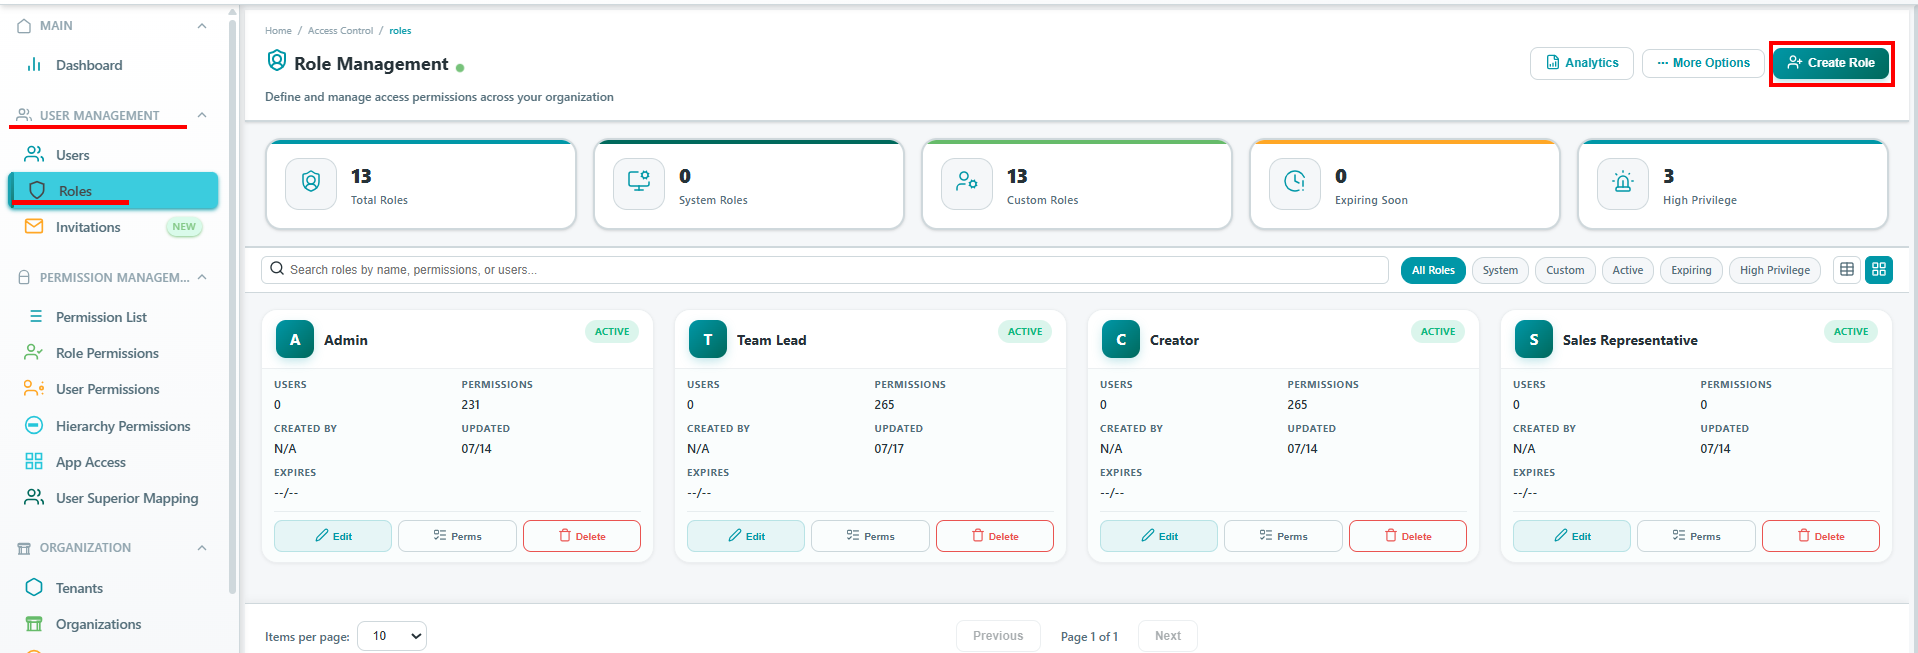
Step 2: Enter Role Name (mandatory) — use UPPERCASE, no spaces, underscores allowed (e.g., SUPPORT_AGENT, TEAM_LEAD, QA_MANAGER).
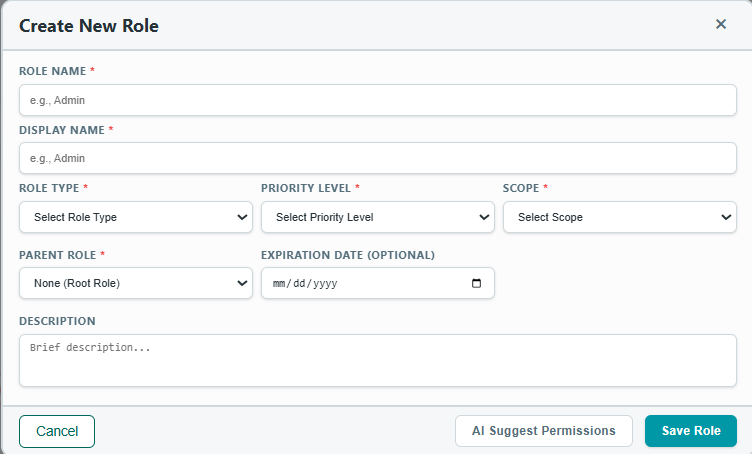
Step 3: Enter Display Name (mandatory) — visible to users in the platform (e.g., Support Agent, Team Lead, QA Manager).
Step 4: Select Role Type (mandatory): System / Predefined / Custom (recommended for new organization-specific roles).
Step 5: Choose Priority Level (mandatory): Standard / Elevated / High / Critical.
Step 6: Set Scope (mandatory): System-wide / Tenant-wide / Organization.
Step 7: Select Parent Role (mandatory): None (Root Role) / Administrator / Manager / Standard User.
Step 8: (Optional) Set an Expiration Date if the role should be temporary.
Step 9: (Optional) Enter a Description explaining the purpose of the role.
Step 10: Click Save Role to create the role successfully.
Step 11: Click the Perms button to assign module-level permissions.
Step 12: Select the required permissions and click Save Changes.
Step 13: Go to Permission Management → User Permissions to select the user and assign the newly created role.
Note: Always follow this sequence → Create Role → Assign Permissions → Assign to Users
How to Create Roles and Users Video
Frequently Asked Questions (FAQ)
Q 1. Can a username be changed after a user account has been created?
A: No, usernames are permanent and cannot be modified after a user account is created. Tenant Administrators should make sure the username is accurate when creating the profile.
Q 2. Can a user belong to multiple organizations or hold multiple roles?
A: Yes. Users can hold multiple roles and belong to multiple organizations. During profile configuration, you can specify their primary organization, list additional organizations they have access to, and assign org-specific roles.
Q 3. What bulk and advanced actions are available under the "More Options" dropdown in User Management?
A: The ... More Options dropdown provides several administrative capabilities: - Upload System Mapping: Import system-to-user mappings using files. - Upload Users: Bulk-import new users. - Download Users: Export user lists. - User Listing with Stages: View users with their associated stages. - User Removal with Stages: Bulk-remove users filtered by stage.
Q 4. What is the correct sequence of steps to fully configure and assign a new role?
A: To properly establish access control, you must always follow this sequence: 1. Create the Role (define role name, display name, priority, scope, and parent role). 2. Assign Permissions (click the Perms button on the role card and configure module-level settings). 3. Assign to Users (go to Permission Management → User Permissions to map the role to specific user accounts).
Q 5. What naming conventions must be followed when creating a new Role Name?
A: The Role Name must be in UPPERCASE and contain no spaces (underscores are permitted). Examples include QA_MANAGER, SUPPORT_AGENT, or TEAM_LEAD.
Q 6. What is the difference between a System Role and a Custom Role?
A: System Roles are built-in, predefined roles essential for system operations. Custom Roles are recommended for organization-specific configurations, allowing administrators to define customized priorities, scopes, parent roles, and expiration terms.
Q 7. How can I search or filter roles on the Role Management dashboard?
A: You can use the Search Bar to search roles by name, permissions, or assigned users. You can also apply Filter Pills (All Roles, System, Custom, Active, Expiring, High Privilege) or switch views between Table and Grid (Card) view toggles.
Q 8. What information is shown on a User Card in Grid View?
A: Each User Card displays: - Profile Header: Initials avatar, full name, email, and current status badge (e.g., ACTIVE). - Organization Tags: Small icons indicating the user's mapped organizations. - Key Details: Mapped reporting manager (SUPERIOR) and assigned system ROLE. - Activity Info: Account creation date and last active timestamp.